How To Set Up An Avalanche Node For The First Time Using CloudJiffy

Setting up a node for the first time can seem pretty daunting for people new to it, especially since it involves messing with a command line and computer code. In this tutorial I will show you everything you need to do to become a node on the Avalanche Network, what to expect, and just everything you need to get started.
Assumptions
- You have at least 2000 AVAX stored in your wallet at wallet.avax.network
- You are able and willing to pay about $10/month to use the Cloudjiffy VPS service (this is an average price for a VPS, and it is worth it if your home internet connectivity and hardware are not reliable enough)
- You are a complete newbie with no prior coding or node experience
Step 1: Create A CloudJiffy Account
Visit https://app.cloudjiffy.co/ and create your first CloudJiffy account. You will have to setup your payment information immediately and preload your balance with money. I recommend $10-$25 and turning on auto-refill.
Step 2: Set Up CloudJiffy Environment
As soon as you are done setting up your account and you are redirected to your dashboard, click on “Create New Environment”. This will pull you up to a window with a lot of different options on it. I will look like this:
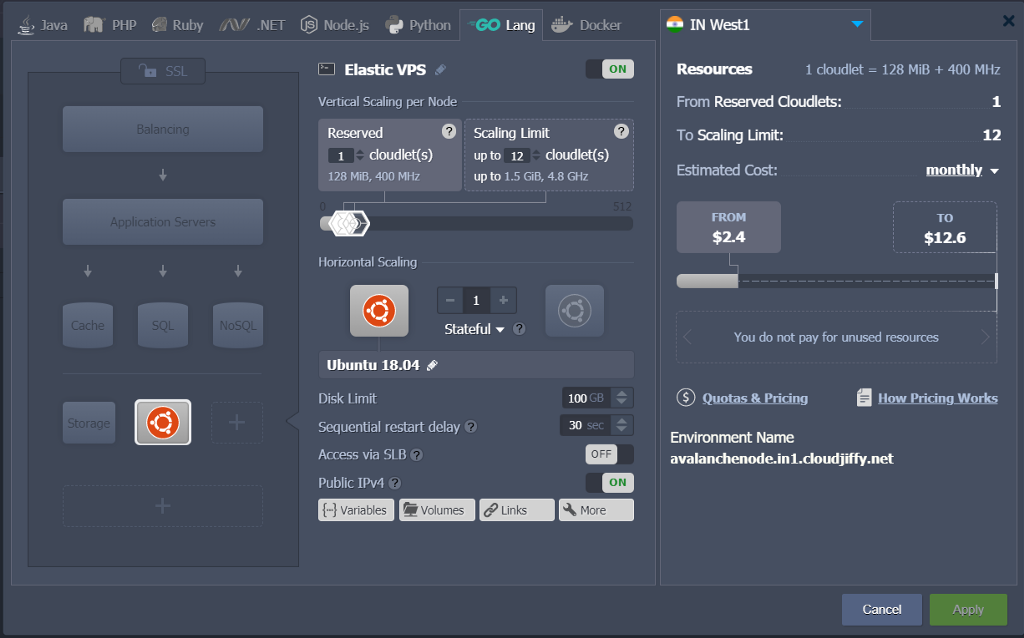
Here is what you need to change or double check:
- Make sure you are on “Go Lang:.
- Make sure to click out of “GO” on the left-hand side of the window (where it says “Application Servers”). If you forget to do this then you will definitely run into errors.
- Enable Ubunto 18.04 on the left-hand side of the window (where it says “vps”).
- At the top-middle, enable “Elastic VPS”.
- At the top-middle, type in 12 cloudlets. Note: It does not have to be this exact number, but this is what I used for my node, and more is generally better.
- At the bottom-middle, enable “public IPV4”.
- (Optional) At the right-hand side, change your billing to “monthly”. This is right next to where it says “estimated cost”.
- (Optional) At the bottom-right side, create a name for your environment.
- Now go ahead and create your environment at the bottom-right side. This will take about 15 minutes for it to complete.
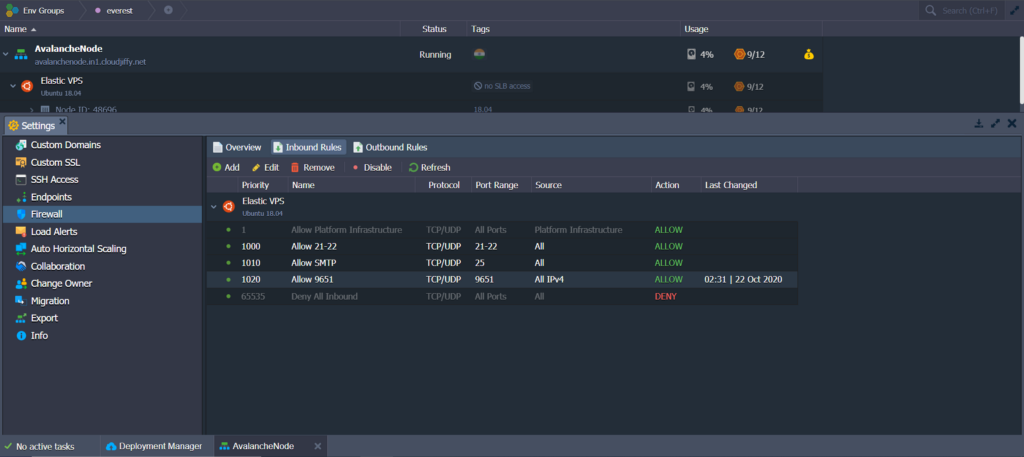
Step 3: Update Port 9651
In order to make sure your connectivity to the Avalanche Network is optimized and uninterrupted, you will want to update this port really quick.
Step 1: Go to your environment, and click the orange “Settings” icon.
Step 2: Scroll down the list until you see “Firewall” Click it.
Step 3: At the top, click “Inbound Rules”.
Step 4: Go to Port 9651. Click it. This will enable a button above at the top of the window that says “Edit”. Click Edit.
Step 5: Go to “Source”. Change “All” (or whatever it says) to “All IPV4”.
This is what this looks like:
Step 4: Open the Command Line
Under your environment there will be a second toolbar that is hidden called “Elastic VPS”. There is actually two separate toolbars here, one at the top, and one at the bottom. You want the one at the bottom.
Hover to the right-hand side of this toolbar to find an icon that looks like a black box and says “Web SSH”.That is your command line. Click it.

This is what the command line looks like (note that the text it displays changes frequently and may say something different):
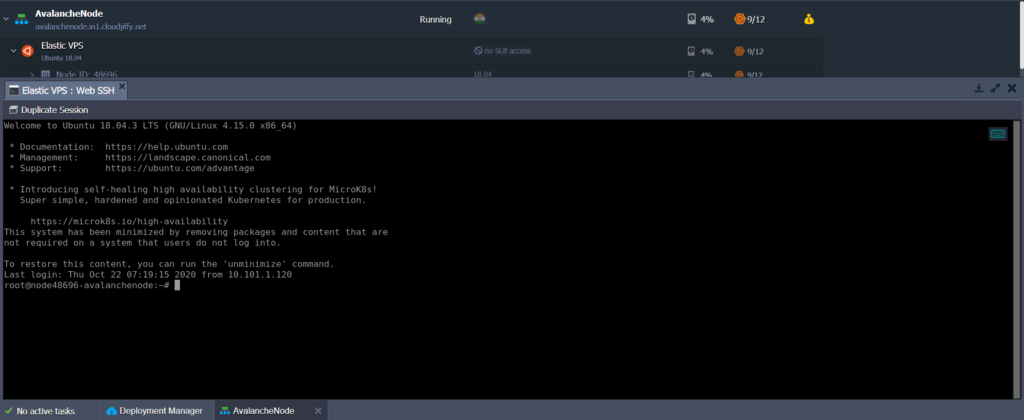
From here on out, all the code you type in is being transmitted to CloudJiffy’s servers, and will run in the background (even if you can’t see it). To keep us in control of our session however, I would like you to perform the next step.
Step 5: Activate TMUX Session-Control
This will be the first line of code you copy and paste into your command line. Are you excited yet? We are getting somewhere.
I am going to give you three lines of code. Copy and paste each line of code individually, by itself. Do not do it all at the same time or it can cause error.
- sudo apt-get update
- apt install tmux
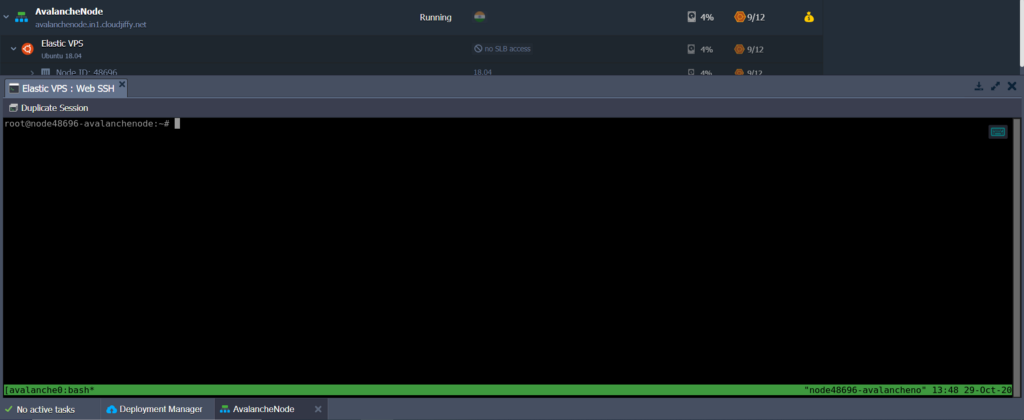
- tmux new -s avalanchenode
This will create your tmux session. If you close out of your node for any reason, you can reactivate it using this:
tmux attach -t avalanchenode (you do not need to type this in unless you close out of your node and want to restore your session)
Technically, you do not have to use the word “avalanchenode”, that is just what I used, You can out any word you want here, as long as it has no numbers, spaces, or special characters. You can also create multiple sessions.
Here is what it looks like:
Step 6: Download The GO language
So that you do not have to go through the GO website, I will give you the steps to download the GO language right here. If this does not work however, try going to the GO site here, in case they have changed the process or anything, as this is on their end. You can also see that the GO website is hyperlinked in the Avalanche Documentation here.
Copy and Paste each of these lines of code one-by-one, individually. Make sure you do not misspell anything.
- wget https://dl.google.com/go/go1.13.linux-amd64.tar.gz
- sudo tar -C /usr/local -xzf go1.13.linux-amd64.tar.gz
- export PATH=$PATH:/usr/local/go/bin
- source ~/.profile
- export GOROOT=/usr/local/go
- export GOPATH=~/go
- export PATH=$PATH:$GOROOT/bin:$GOPATH/bin
Step 7: Check Go Version and Echo Gopath
If you did everything correctly, and nothing fundamental here has been changed on the other ends, then your Go Version and Echo Gopath should be correct. However, mistakes do happen, so please do the following to make sure everything thus far is correct. If one of these two things is not correct, go back through the previous steps before continuing. If these two things do not say the correct things, then you will definitely be unable to complete your node setup. For further help, visit chat.avax.network.
In order to check these two things, type the two following lines of code in, separately and individually:
- go version
- echo $GOPATH
Go Version should say 1.13 or above, and Echo Gopath should not be empty.
If either of these two things are not correct, you will be unable to finish completing your node setup, as your node is built using the correctly pathed Go software. If it is incorrect, try going back through the steps. If this does not work, ask the Avax community in Discord. If there is a problem with this article, then please notify me on telegram or twitter so that I can fix it for future newbies.
Step 8: Connecting To The Avalanche Network
For this first part of this step, go ahead and copy and paste the following lines of code, individually and one-by-one:
- sudo apt-get install libssl-dev libuv1-dev cmake make curl g++
- apt install git
- go get -v -d github.com/ava-labs/avalanchego/…
- If the previous line did not work, try the following one:
- cd go/src/github.com/ava-labs/avalanchego
- ./scripts/build.sh
- ./build/avalanchego
At this point, if everything was successful, then it should say that your node is being built and you will see a lot of text all at once. It could take about two hours for your node to fully bootstrap. For more information visit the Avalanche Documentation and FAQ.
Step 9: Creating A Keystore User and Getting Your NodeID
We are almost done! We just need to do a few more things. Everything in this section is fully covered in the Avalanche Documentation.
If you want, you can end this tutorial here, do the rest of it from the documentation, and then just finish everything up using this quick wallet tutorial. Or you can continue on. It is your choice.
First, we need to make sure that our node is done bootstrapping. To do this, copy and paste the following. Make sure no spacing is incorrect:
"jsonrpc":"2.0",
 "id" :1,
 "method" :"info.isBootstrapped",
 "params": {
 "chain":"X"
 }
}' -H 'content-type:application/json;' 127.0.0.1:9650/ext/info
If this returns true, the chain is bootstrapped. If you make an API call to a chain that is not done bootstrapping, it will return API call rejected because chain is not done bootstrapping. Additionally, you might double check the Avalanche Documentation if anything about the command looks incorrect, because it could be updated. If your node never finishes bootstrapping, contact someone at Discord.
Now we need to create a keystore user. Note, for the following step, anything in triangle brackets (“<>”) is something you need to replace with your own personal information. For your username, put anything you want, but for your password, it has to be very long and very strong. For your password, I recommend just “punching your keyboard” and make sure you’ve got capitalized letters and numbers. Please save your username and password in a text file somewhere so you do not forget. For enhanced security, you could use a password manager like Bitwarden to save this password.
Copy and paste the following command into a text editor, change the bracketed information, and then copy and paste it into your command line:
curl -X POST --data '{
 "jsonrpc": "2.0",
 "id": 1,
 "method": "keystore.createUser",
 "params": {
 "username": "<YOUR USERNAME HERE>",
 "password": "<YOUR PASSWORD HERE>"
 }
}' -H 'content-type:application/json;' 127.0.0.1:9650/ext/keystore
Double-check the Avalanche Documentation, and make sure everything is correct. It should say exactly the same thing.
If successful, your node will say this:
{
 "jsonrpc":"2.0",
 "result":{"success":true},
 "id":1
}
Now we need to create an address on the X-Chain. Copy and paste the following command into a text editor, change the bracketed information, and then copy and paste it into your command line:
curl -X POST --data '{
 "jsonrpc":"2.0",
 "id"  :2,
 "method" :"avm.createAddress",
 "params" :{
 "username":"<YOUR USERNAME HERE>",
 "password":"<YOUR PASSWORD HERE>"
 }
}' -H 'content-type:application/json;' 127.0.0.1:9650/ext/bc/X
Double-check the Avalanche Documentation, and make sure everything is correct. It should say exactly the same thing.
The response should look something like this:
{
 "jsonrpc":"2.0",
 "id":2,
 "result" :{
 "address":"X-avax1xeaj0h9uy7c5jn6fxjp0rg4g39jeh0hl27vf75"
 }
}
Do note, the X-Address I listed isn’t your X-Address, its just an example X-Address. Your X-Address will be different, and please do not get them confused. Also you should copy and save it for safekeeping.
As a separate note, please do not send all your funds to your node’s X-Address. You don’t need to do this, and it is not very safe. Everything can be done from your wallet.
Now we need to get our NodeID. From here I will be going off a different portion of the Avalanche Documentation, found here. Copy and paste the following command:
curl -X POST --data '{
 "jsonrpc":"2.0",
 "id" :1,
 "method" :"info.getNodeID"
}' -H 'content-type:application/json;' 127.0.0.1:9650/ext/info
Double-check the Avalanche Documentation, and make sure everything is correct. It should say exactly the same thing.
This is what the response should look like:
{
 "jsonrpc": "2.0",
 "result": {
 "nodeID": "NodeID-5mb46qkSBj81k9g9e4VFjGGSbaaSLFRzD"
 },
 "id": 1
}
Do note, the NodeID I listed isn’t your NodeID, its just an example NodeID. Your NodeID will be different, and please do not get them confused. Also you should copy and save it for safekeeping.
If all previous steps were successful, then congratulations, you are now running a node! In order to become a validator on the network with actual stake on the line, just follow this final step.
Step 10: Activate Your Node From Your Wallet
This is the tenth and final step required in setting up your node. As a safety feature, AvaLabs designed the Avalanche staking process so that you can remotely validate with your node, so that you do not have to send the entirety of your funds to your node, which is definitely less safe. Although you could do this if you so chose to, I highly recommend against it. There is a super easy and simplistic interface for doing it through your wallet, and it is way safer too.
If you have not done so already, make sure your funds are secure. Make sure your clipboard stays clear when you visit other websites, you aren’t storing your seed anywhere unsafe, and you do not have malicious key-loggers or malware installed on your computer. If you have any safety concerns with your wallet and how you have handled it, you might consider moving your funds to a new wallet. You can also use a Ledger Nano S hardware wallet to store your funds (this feature is currently in experimental beta).
First, go to your wallet at wallet.avax.network. At the left, there will be a tab called “Earn”. Click it.
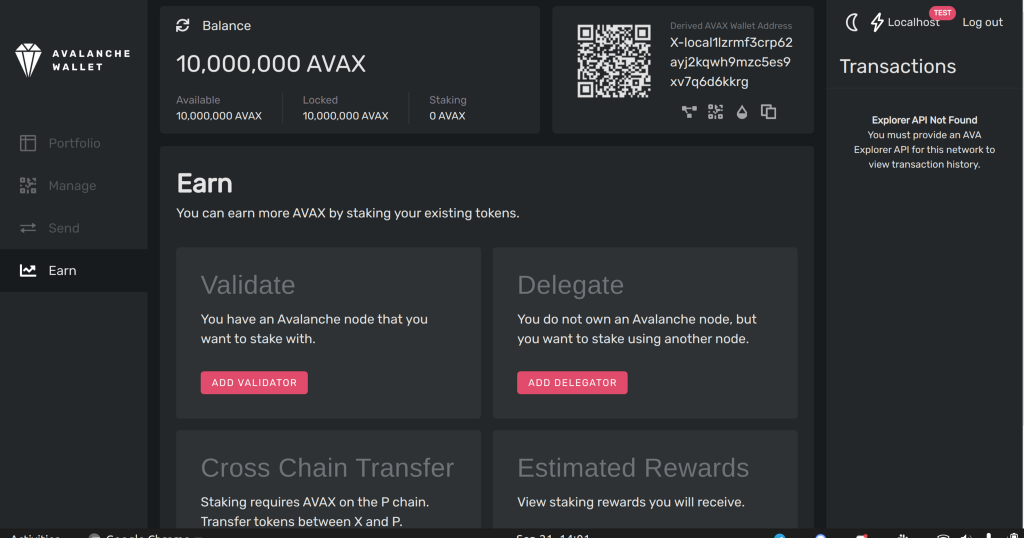
Go to “Add Validator”. Click it.
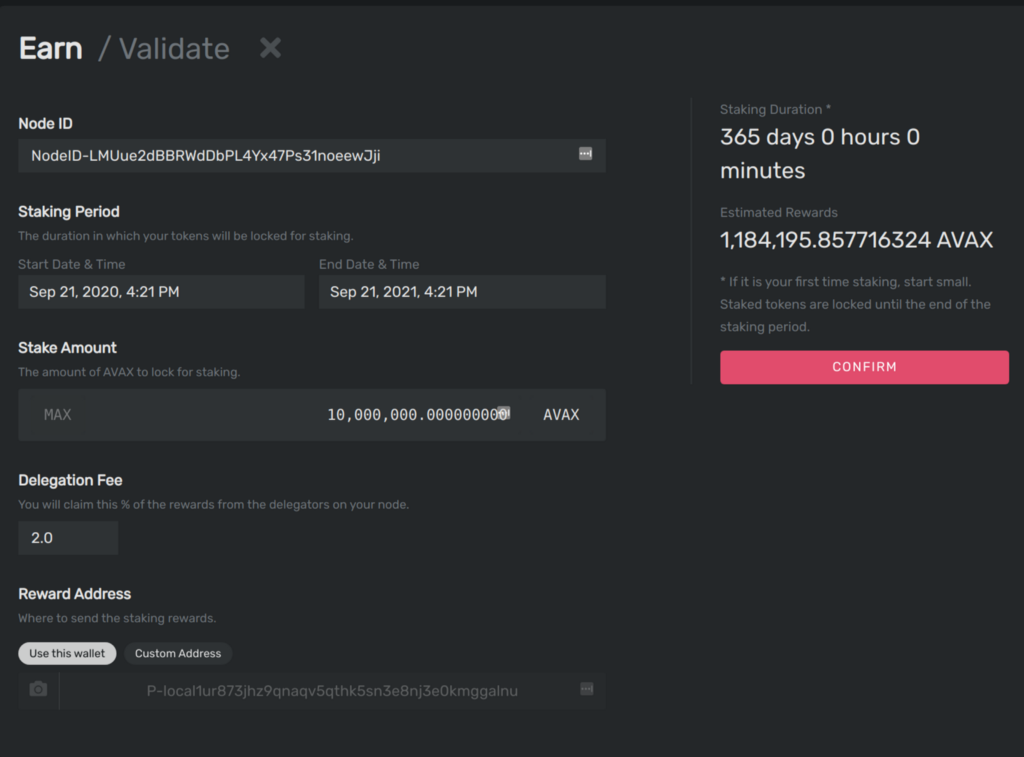
Make sure you put in your NodeId, and double check spelling. Check your stake time, make sure you have it set for the time period you want (it’s recommended that you don’t do a full year for your first time). Decide your delegation fee, or just leave it at 2%. And then press “Confirm”.
Now from here, we just want to make sure everything looks correct.
First thing to double check. Go to your node’s command line and copy and paste this. You should see your NodeID in here if its pending, but if its current than you might not see it:
curl -X POST --data '{
 "jsonrpc": "2.0",
 "method": "platform.getPendingValidators",
 "params": {},
 "id": 1
}' -H 'content-type:application/json;' 127.0.0.1:9650/ext/P
If your node was not in pending validators, then check current validators. You should see your NodeID in here. (Do note that this is a long list however).
curl -X POST --data '{
 "jsonrpc": "2.0",
 "method": "platform.getCurrentValidators",
 "params": {},
 "id": 1
}' -H 'content-type:application/json;' 127.0.0.1:9650/ext/P
Second thing to double check. Go back to your wallet and go to “Earn” again. Now go to “Estimated Rewards”. This should be a positive number.

Third thing to double check. Visit Avascan and make sure your Node is being reported with good performance. If you see any nodes displaying 0% there is a possibility that could be signifying a problem, but generally as long as it says your overall performance is above 90% (or at least 60%) then you should be fine. It might also take some time to start reporting correctly, so if it doesn’t say the right thing immediately, then give it a few hours.
And That’s it!
Congratulations, if you did not run into any difficulties, then your node should be fully up and functioning, and you should be in the current process of earning rewards on your AVAX as a validator. If this tutorial worked out well for you, then feel free to share it with others.
If you are having difficulties, ask Discord, under “Troubleshooting” or “Validators-Chat”.
If anything in this article is inaccurate or outdated, then please contact me on telegram or twitter so that I can fix it for future newbies.
Special thanks to Flarcos for being the original guy that onboarded me to Cloudjiffy using his older testnet tutorial.
More Information Here: Quickstart, Add Validators, How To Validate or Delegate
If you need to update your node, then click here.
To Support Me:
Delegate: NodeID-MYWy8UpV6EAdyBgqGLmEK3EoGeAFmSp9R
Donate: X-avax13t0xwrxvl9wnkphgd7fh0nxfnyewjylzhyux6x
Thanks for reading.
![]()
How To Set Up An Avalanche Node For The First Time Using CloudJiffy was originally published in Avalanche Hub on Medium, where people are continuing the conversation by highlighting and responding to this story.