Metamask Tutorial
Learn how to add avalanche to metamask
As you know, Avalanche has a build in EVM (Ethereum Virtual Machine), and you can use Metamask to connect to the smart-contract chain of Avalanche (called C-Chain).
Here is a tutorial on how add avalanche to metamask so you connect your metamask to the virtualized Ethereum network that works under Avalanche concensus, meaning the fee price and speed it can work its much more high than what you get using the real Ethereum network. You can get confirmation in literally seconds.
For those who dont know metamask, its just an extension for your browser and it acts basically as an Ethereum wallet, and also helps to speed up the interaction with some services that use ethereum in a less friction way.
Get metamask at https://metamask.io/ and once installed in your browser you will be able to continue this tutorial.
Once open select to add a new Custom RPC:
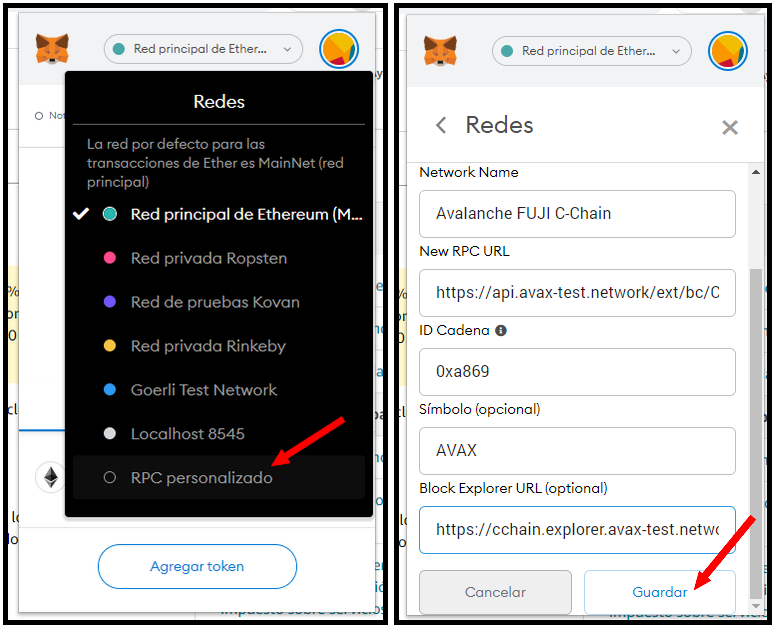
Now you must select what of those two settings you are interested, if you want send real AVAX you must select the mainet seetings, if you want send test tokens from the Fuji Network of Avalanche, use the testnet settings:
Avalanche Mainnet Settings:
Network Name: Avalanche Mainnet C-Chain
New RPC URL: https://api.avax.network/ext/bc/C/rpc
ChainID: 0xa86a
Symbol: AVAX
Explorer: https://cchain.explorer.avax.network/
Add Fuji Testnet to Metamask:
FUJI Testnet Settings:
Network Name: Avalanche FUJI C-Chain
New RPC URL: https://api.avax-test.network/ext/bc/C/rpc
ChainID: 0xa869
Symbol: AVAX
Explorer: https://cchain.explorer.avax-test.network
And thats pretty much the Tutorial!
If you want use the Fuji Network and you dont have worthless test tokens, you can get them at https://faucet.avax-test.network/
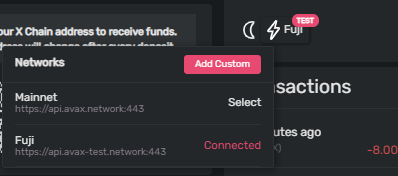
Now from inside the wallet select your prefered network, in this case we are going ot use Fuji:
You must have the tokens inside the C-Chain, the smart-contract chain:
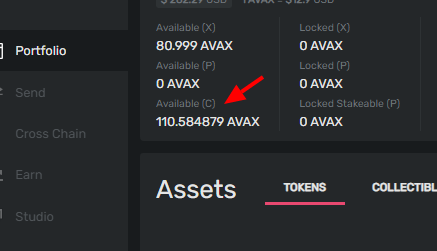
To move the tokens to the C chain, use the “Cross Chain” option on the left menu and move from X to C as many tokens as you want.
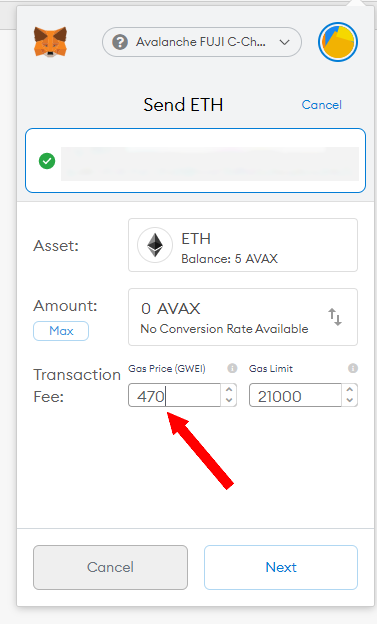
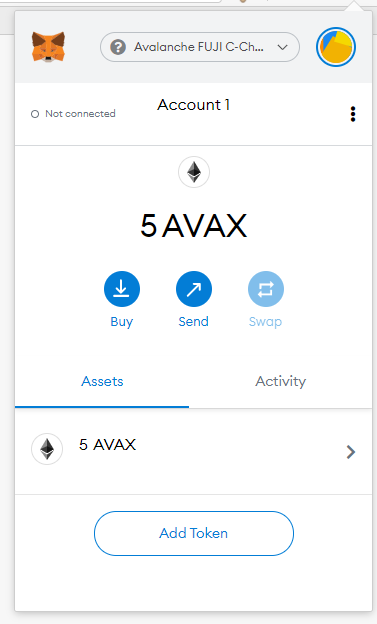
Now is as easy as open the “Send” option of the menu, select “Contract” fill the amount, in this case 5 AVAX,
insert the address metamask returns when contected to the C-Chain Testnet.
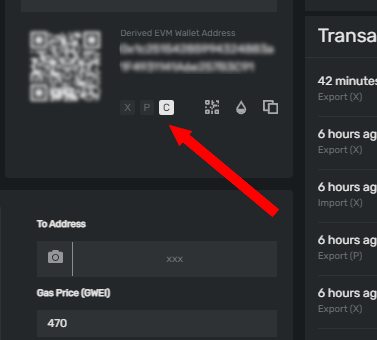
Use always 470 on Gas and Limit of 21000. Confirm.

You will receive the amount in your Metamask Wallet!
If you want send the money back from Metamask to your Avalanche Wallet, just click “send” on metamask, and fill the fields of address and amount. Make sure to put 470 Gas.
The C-Chain address of your Avalanche wallet can be found if you click on the “C” icon.
Congratulations! now you know how to interact with thet C-Chain using Metamask.