Introduction to Avalanche: Kicking of the new Avax Developers Blog Series
Introduction to Avalanche: Kicking Off the New Avax Developers Blog Series
From Snowflake to Avalanche through consensus to the stars.
Getting Started Building on Avalanche
Avalanche is an open-source platform for building decentralized applications in one interoperable, highly scalable ecosystem. It is the first ecosystem designed to accommodate the scale of global finance, with near-instant transaction finality. That means that after issuing a transaction to the network it will be included in the chain within about two seconds and is immutable from there on. Ethereum has a finality of about 15 minutes and Bitcoin has a finality of about one hour.
Avalanche is a global financial network for the issuing and trading of all digital goods. The Avalanche network enables potentially millions of validators to process thousands of transactions per second using a protocol which is completely green and quiescent. This high-throughput and fast finality protocol has been paired with an architecture that can meet the needs of unique financial services and decentralized apps.
This is accomplished through the notion of Subnets. Subnets allow anyone, anywhere to spin up a taylor-made network with custom virtual machines and complex validator rulesets. Avalanche is a network of networks. It’s a platform of platforms where we invision thousands and thousands of public and private Subnets all emerging into this global marketplace which we call The Internet of Finance.
Unique Features
Avalanche has 3 unique features which set it apart from competitors. Consensus, Virtual Machines and Subnets.
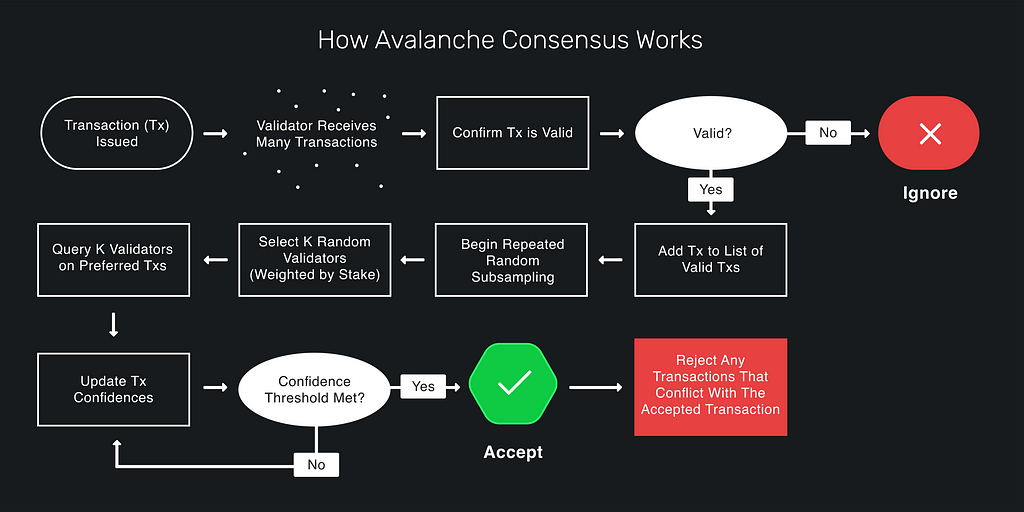
Consensus is the process of getting a set of computers to agree on something and it’s a rich field of computer science dating back 40 years. Avalanche Consensus represents the 3rd major paradigm in the field of consensus and is a metastable consensus protocol inspired by epidemic protocols and gossip networks. Avalanche Consensus enables tens of thousands of transactions per second, with sub-second immutable and irreversible finality validated by potentially millions of validators globally. Here is an Avalanche Consensus Demo created by Ava Labs’ Ted Yin.
A Virtual Machine is the blueprint for a custom blockchain on the Avalanche network. VMs contain the application-level logic for your blockchain and are akin to a class in object-oriented programming. A VM can be instantiated into many different instances of blockchains — each completely independent and with it’s own state. VMs aren’t limited to existing blockchain tech use cases such as P2P payments or defi and can be any use case which requires decentralization and consensus. VMs can be implemented in any language which can implement a GRPC API which enables developers to leverage modern tools and workflows which they’re familiar with.
A Subnet is a dynamic set of Validators working together to achieve consensus on the state of a set of blockchains. Subnets can compose their constituent validator sets via powerful rulesets. Subnets can be permissioned or permissionless — public or private. Subnets are used for scaling by enabling developers to launch application-specific-blockchains on different Subnets as opposed to many apps sharing the same blockchain. Subnets can communicate via Avalanche Warp Messaging.
Consensus
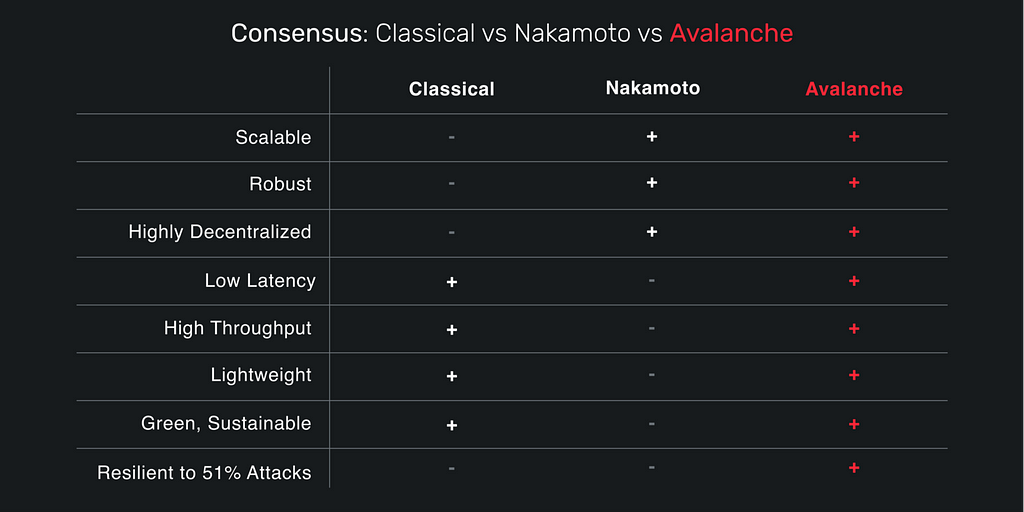
As previously mentioned, Avalanche Consensus is the 3rd major paradigm in the field of consensus. The first was called Classical Consensus and it goes back to the 80s. Classical Consensus has low latency and very high throughput. It’s lightweight and green. However it isn’t very scalable nor robust and it performs poorly in adversarial conditions.
In 2008/2009 when Satoshi Nakamoto released Bitcoin the world was introduced to the 2nd major paradigm in the field of consensus, what ultimately became known as Nakamoto Consensus. Nakamoto Consensus is very scalable, robust and decentralized but it doesn’t have low latency, it takes around an hour to be sure your transaction is sufficiently settled that you won’t experience a reorg. It doesn’t have high throughput, Bitcoin only does a handful of transaction per second. It’s not lightweight or green, Bitcoin burns more energy each day than some nation states. Lastly, Nakamoto Consensus performs ok in adversarial conditions up to the famous 51% attack.
In 2018 a pseudonymous group going by the name “Team Rocket” released a white paper on the InterPlanetary File System (IPFS) describing a 3rd major paradigm shift in the field of consensus. This new breakthrough was known as Avalanche Consensus. Avalanche Consensus is the perfect storm of features from Classical and Nakamoto Consensus.
It’s very scalable, robust and decentralized. There are currently around 1500 full block and vertex producing validators on the Avalanche network. The protocol theoretically enables millions of validators so it’s very decentralized. Avalanche consensus has low latency with subsecond immutable and irreversible finality. There is no notion of a reorg on Avalanche. Within a literal blink of an eye your transaction has settled completely. Avalanche has high throughput with 10s of thousands of transactions per second. It’s very lightweight and green and can be run on a PC, a Macbook, a VPS droplet on the cloud and in the future on Internet of Things devices. And Avalanche consensus is parameterizable so it performs very well in adversarial conditions.
Virtual Machines
Traditional blockchain networks, such as Bitcoin and Ethereum, consist of a single virtual machine and set of validators. Avalanche is a network of many different virtual machines all deployed on Subnets and communicating with each other as needed. This architecture leads to network effects on the individual blockchains and compound network effects between subnets and blockchains.
A Virtual Machine is a state machine. It specifies the blockchain’s state, state transition function, transactions, and the API through which users can interact with the blockchain. Every blockchain on Avalanche is an instance of a VM.
The way to think of a VM is like a class in OOP. A class is a description or an object. It’s a template from which you can instantiate as many objects as you wish. Each of these objects, though derived from a common template, are unique and logically separate entities with their own state. Similar to a class, a VM is a blueprint or template from which you can instantiate as many different instances of a blockchain as you wish. Each of these blockchains, though derived from a common template, are unique and logically separate entities with their own state.
As a developer when you write a VM, you don’t need to concern yourself with lower-level logic like networking, consensus, or the structure of the blockchain. Avalanche does this behind the scenes so you can focus on the thing you would like to build.
On Avalanche you can build your VM in any language that you choose. To see examples of existing Virtual Machines check out:
Golang
- Coreth An implementation of the EVM that powers the Avalanche C-Chain that supports Solidity smart contracts.
- Subnet-EVM An implementation of the EVM that can be deployed to a custom Subnet to support Solidity smart contracts
- SpacesVM An authenticated, hierarchical key-value store w/EIP-712 compatibility, state expiry, and fee-based metering
- BlobVM A content-addressable key-value store w/EIP-712 compatibility and fee-based metering
- TimestampVM A decentralized timestamp server
- XSVM An example of Avalanche Warp Messaging that implements Cross-Subnet asset transfers
Rust
The following VMs were built using Rust via the Avalanche Rust SDK
- TimestampVM RS A Rust implementation of TimestampVM
- SpacesVM RS A Rust implementation of SpacesVM
For more information on building VMs check out:
Subnets
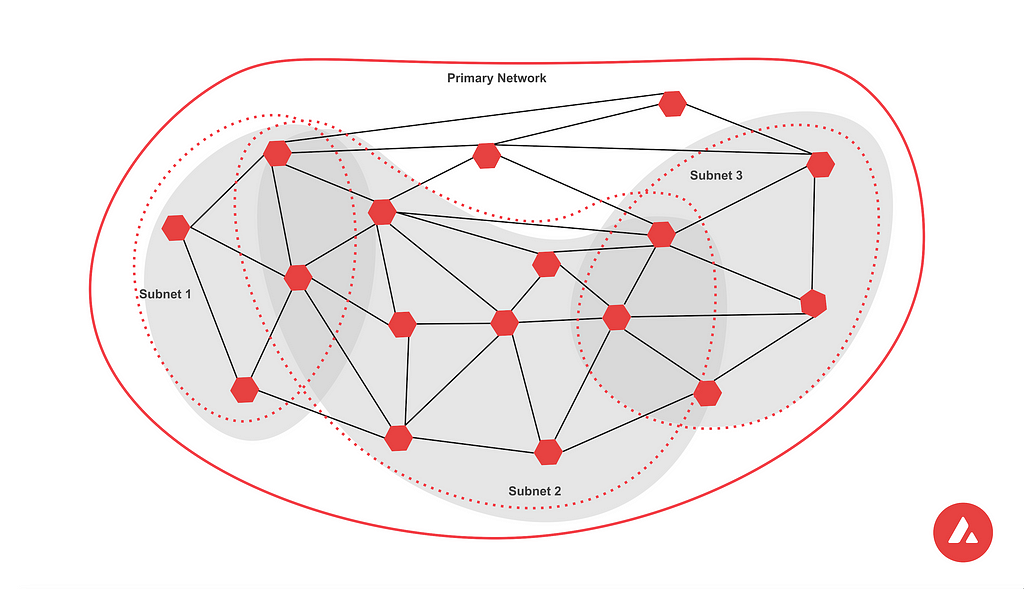
A Subnet is a sovereign network which defines its own rules regarding its membership and token economics. Subnets are independent, they specify their own execution logic, determine their own fee regime, maintain their own state, facilitate their own networking, and provide their own security. They don’t share execution thread, storage or networking with other Subnets including the Primary Network, effectively allowing the network to scale up easily while enabling lower latency, higher transactions per second (TPS), and lower transaction costs provided by the Avalanche Consensus.
A Subnet manages its own membership, it can create its own token economics and rules, and may require that its constituent validators have certain properties.
Independent Token Economics
Subnets can have their own token economics with their own native tokens and fee markets. They can launch their own blockchains with customized virtual machines.
Compliance
Avalanche’s Subnet architecture makes regulatory compliance manageable. As mentioned above, a Subnet may require validators to meet a set of requirements.
Some examples of requirements include:
- Validators must be located in a given country
- Validators must pass a KYC/AML checks
- Validators must hold a certain license
Application-Specific Requirements
Different blockchain-based applications may require validators to have certain properties. Suppose there is an application that requires large amounts of RAM or CPU power. A Subnet could require that validators meet certain hardware requirements so that the application doesn’t suffer from low performance due to slow validators.
Support for Private Blockchains
You can create a Subnet where only certain pre-defined validators may join and create a private Subnet where the contents of the blockchains would be visible only to those validators. This is ideal for organizations interested in keeping their information private. See here for more info.
Separation of Concerns
In a heterogeneous network of blockchains, some validators will not want to validate certain blockchains because they simply have no interest in those blockchains. The Subnet model allows validators to only concern themselves with blockchains that they care about. This reduces the burden on validators.
Tools and Resources
Following is a list of tools and resources to help developers onramp onto the Avalanche Platform. This should include running a node, sending it queries, SDKs for sending transactions, creating virtual machines and Subnets and the associated documentation.
Avalanche Docs
Here are the official Avalanche docs. These are the canonical Avalanche platform docs.
AvalancheGo
AvalancheGo is a full Avalanche node. It’s written in Golang and required for running local networks for development or for running a node and connecting to the Fuji testnet or the mainnet.
The minimum recommended hardware specification for nodes connected to Mainnet is:
- CPU: Equivalent of 8 AWS vCPU
- RAM: 16 GiB
- Storage: 1 TiB
- OS: Ubuntu 20.04/22.04 or macOS >= 12
- Network: Reliable IPv4 or IPv6 network connection, with an open public port.
Binary Install
Download the latest build for your operating system and architecture. The Avalanche binary to be executed is named avalanchego.
You can also build from source, install with apt and install with docker.
Connect to the Network
./path/to/avalanchego --http-host=my.http.host --network-id=fuji --public-ip=my.ip.address
By default avalanchego will connect to the mainnet which will require significantly more time to bootstrap than the fuji network. Configure which network the node should bootstrap by passing in the –network-id flag. You can get funds for the Testnet from the faucet.
To be able to make API calls to your node from other machines, when starting up the node include the –http-host= flag. In order to ensure your node is well-connected, make sure that your node can receive and send TCP traffic on the staking port (9651 by default) and that you started your node with config flag –public-ip=[YOUR NODE'S PUBLIC IP HERE]. Failing to do either of these may jeopardize your staking reward.
Starting a full node this way is fine if you’re doing short-term experimental work. For instances where you intend to keep your node online for longer you should set up a system service. The installer script can do that for you.
AvalancheGo is a core software component needed for developing dapps and VMs for Avalanche. It’s required for running an individual node and a local test network. More info: Github Repo.
Avalanche Network Runner
While AvalancheGo is useful for running a single node the Avalanche Network Runner (ANR) is a tool to run and interact with a local Avalanche network and is especially useful for development and testing.
Installation
To download a binary for the latest release, run:
curl -sSfL <https://raw.githubusercontent.com/ava-labs/avalanche-network-runner/main/scripts/install.sh> | sh -s
The binary will be installed inside the ~/bin directory. To add the binary to your path, run
export PATH=~/bin:$PATH
To add it to your path permanently, add an export command to your shell initialization script (ex: .bashrc or .zshrc). You can also build from source.
Run a 5 Node Local Network
The easiest way to run a local network with the ANR is to use the example script to fire up a 5 node network.
git clone <https://github.com/ava-labs/avalanche-network-runner.git>
cd avalanche-network-runner
go run examples/local/fivenodenetwork/main.go
[03-29|18:18:35.873] INFO fivenodenetwork/main.go:93 waiting for all nodes to report healthy...
[03-29|18:18:35.873] INFO local/network.go:631 checking local network healthiness {"num-of-nodes": 5}
[03-29|18:18:44.886] INFO fivenodenetwork/main.go:98 All nodes healthy. Network will run until you CTRL + C to exit...
You can now send curl requests to the nodes on localhost
curl --location '<http://127.0.0.1:9650/ext/info>' \\
--header 'Content-Type: application/json' \\
--data '{
 "jsonrpc":"2.0",
 "id" :1,
 "method" :"info.isBootstrapped",
 "params": {
 "chain": "X"
 }
}'
{
 "jsonrpc": "2.0",
 "result": {
 "isBootstrapped": true
 },
 "id": 1
}
More info on the ANR Github Repo.
AvalancheCLI
The Avalanche Network Runner is very helpful for launching a local network running the primary Subnet. This is great for interacting with the X, P or C-chains. However, if you want to deploy and test Subnets then you want to use AvalancheCli. Avalanche CLI is a command line tool that gives developers access to everything Avalanche. This release specializes in helping developers develop and test subnets.
Installation
The tool has been tested on Linux and Mac. Windows is currently not supported. To download a binary for the latest release, run:
curl -sSfL <https://raw.githubusercontent.com/ava-labs/avalanche-cli/main/scripts/install.sh> | sh -s
The binary will be installed inside the ~/bin directory.
To add the binary to your path, run
export PATH=~/bin:$PATH
To add it to your path permanently, add an export command to your shell initialization script (ex: .bashrc or .zshrc).
You can also build locally or install via docker.
Quickstart
After installing, launch your own custom subnet:
avalanche subnet create <subnetName>
avalanche subnet deploy <subnetName>
Shut down your local deployment with:
avalanche network stop
Restart your local deployment (from where you left off) with:
avalanche network start
More info on AvalancheCli in the Github Repo.
AvalancheJS
AvalancheJS is a JavaScript Library for interfacing with the Avalanche Platform. It is built using TypeScript and intended to support both browser and Node.js. The AvalancheJS library allows you to issue commands to the Avalanche node APIs.
The APIs currently supported by default are:
- Admin API
- Auth API
- AVM API (X-Chain)
- EVM API (C-Chain)
- Health API
- Index API
- Info API
- Keystore API
- Metrics API
- PlatformVM API (P-Chain)
- Socket
Installation
Avalanche is available for install via yarn:
yarn add avalanche
You can also pull the repo down directly and build it from scratch:
yarn build
Examples
AvalancheJS has dozens of example scripts in the examples/ directory.
ts-node examples/info/isBootstrapped.ts
true
More info on AvalancheJS in the Github Repo
Glacier
The Glacier API is a developer’s one-stop-shop for all enriched blockchain data from Avalanche and Ethereum and the official API service indexing Avalanche Subnets.
The Glacier API Beta gives developers a wide range of useful data for explorer and wallet services, token transfers and more. Originally created to power the Avalanche Subnet Block Explorer, Glacier also powers Core Wallet — providing balances, transfers, and associated metadata for native assets, ERC-20 tokens and NFTs.
With Glacier, application developers can easily build products that leverage real-time and historical transaction data — all served through highly performant APIs. Developers that join the Glacier API Beta will get access to the platform’s service for free and have the opportunity to shape future feature development.
Glacier’s capabilities as a powerful indexed blockchain data provider will expand to include additional raw and derived transaction data as user feedback helps guide this process.
There is a public Swagger UI for quickly testing out the Glacier API and customizing requests POST body and copying curl statements for easily sharing requests.
For example, first let’s GET the list of chains supported by the api. At the time of writing is 14 chains including the following:
- Avalanche C-Chain (Fuji and Mainnet)
- Ethereum
- DFK Subnet (Fuji and Mainnet)
- Swimmer Network Subnet (Fuji and Mainnet)
- Dexalot Subnet (Fuji and Mainnet)
- Loco Legends Subnet (Fuji and Mainnet)
- D-Chain
- WAGMI Subnet
- Green Dot Subnet
Request
/v1/chains
curl -X 'GET' \\
 '<https://glacier-api.avax.network/v1/chains>' \\
 -H 'accept: application/json'
Response
NOTE that the response is truncated after one chains object.
{
 "chains": [
 {
 "chainId": "43114",
 "chainName": "Avalanche (C-Chain)",
 "description": "The Contract Chain (C-Chain) runs on an Ethereum Virtual Machine and is used to deploy smart contracts and connect to dapps.",
 "platformChainId": "2q9e4r6Mu3U68nU1fYjgbR6JvwrRx36CohpAX5UQxse55x1Q5",
 "subnetId": "11111111111111111111111111111111LpoYY",
 "vmId": "mgj786NP7uDwBCcq6YwThhaN8FLyybkCa4zBWTQbNgmK6k9A6",
 "vmName": "EVM",
 "explorerUrl": "<https://snowtrace.io>",
 "rpcUrl": "<https://api.avax.network/ext/bc/C/rpc>",
 "wsUrl": "wss://api.avax.network/ext/bc/C/ws",
 "isTestnet": false,
 "utilityAddresses": {
 "multicall": "0xed386Fe855C1EFf2f843B910923Dd8846E45C5A4"
 },
 "networkToken": {
 "name": "Avalanche",
 "symbol": "AVAX",
 "decimals": 18,
 "description": "",
 "logoUri": "<https://glacier-api.avax.network/proxy/chain-assets/cb14a1f/chains/43114/token-logo.png>"
 },
 "chainLogoUri": "<https://glacier-api.avax.network/proxy/chain-assets/cb14a1f/chains/43114/chain-logo.png>"
 },
 ...
}
Next let’s take that returned chainId and get the latest blocks indexed for that chain.
Request
/v1/chains/{chainId}/blocks?pageSize=&pageToken=
NOTE that this request has 1 URL required URL parameter and 2 optional query string parameters.
- chainId string (path): A supported evm chain id. Use the /chains endpoint to get a list of supported chain ids.
- pageSize integer (query): The maximum number of items to return. The minimum page size is 1. The maximum pageSize is 100.
- pageToken string (query): A page token, received from a previous list call. Provide this to retrieve the subsequent page.
curl -X 'GET' \\
 '<https://glacier-api.avax.network/v1/chains/43114/blocks?pageSize=10>' \\
 -H 'accept: application/json'
Response
NOTE that the response is truncated after one blocks object.
{
 "blocks": [
 {
 "blockNumber": "27398610",
 "blockTimestamp": 1678738466,
 "blockHash": "0x15a9fa15115f43f41844a718ded08e959a237dc6168fdb29736489edded081bc",
 "txCount": 9,
 "atomicTxCount": 0,
 "baseFee": "25000000000",
 "gasUsed": "6544183",
 "gasLimit": "8000000",
 "gasCost": "400000",
 "parentHash": "0xf152746ab4aea61d8db992a1953e3d379633eaaac4291d29b56cf957f8be64e3",
 "feesSpent": "173650909164332187",
 "cumulativeTransactions": "222464194"
 },
 ...
 ],
 "nextPageToken": "eyJzayI6eyJTIjoiMDAwMDAwMDAwMWEyMTFiZiJ9LCJpc0Jsb2NrIjp7Ik4iOiIxIn0sInBrIjp7IlMiOiJCIzB4OGRhYjQwZTAxMDFhZTdkNzJhNmQyYjE1M2Q0ZWI5NWE4MDQyOGZjMzcwYmYwYzgyZjFkMjczM2M5NTI1NGM1YSJ9LCJibG9ja1NrIjp7IlMiOiJCIzAwMDAwMDAwMDFhMjExYmYifX0"
}
Postman Collection
Postman is an API platform for building and using APIs. Postman simplifies each step of the API lifecycle. The Avalanche Postman collection supports the full JSON RPC.
Installation
- Download Postman
- Import Avalanche Postman Collection. Import -> Upload Files -> Avalanche.postman_collection.json
- Import the Example Avalanche Postman Environment. Settings -> Import -> Choose Files -> Example_Avalanche_Environment.postman_environment.json
- Call any Avalanche RPC endpoint
Usage
curl --location '<https://api.avax.network/ext/info>' \\
--header 'Content-Type: application/json' \\
--data '{
 "jsonrpc":"2.0",
 "id" :1,
 "method" :"info.isBootstrapped",
 "params": {
 "chain": "X"
 }
}'
{
 "jsonrpc": "2.0",
 "result": {
 "isBootstrapped": true
 },
 "id": 1
}
~Written by Gabriel Cardona
Introduction to Avalanche: Kicking of the new Avax Developers Blog Series was originally published in Avalanche on Medium, where people are continuing the conversation by highlighting and responding to this story.